


The Ultimate Guide to Micropipettes (2025 Edition)
Micropipettes, often simply called pipettes, are essential laboratory instruments designed for highly accurate and precise measurement and transfer of small liquid volumes, typically ranging from 1–10,000µl. Virtually every modern biological, chemical, or clinical laboratory depends on these tools for day-to-day sample handling. In this in-depth guide, you'll learn about micropipette types, their core components, usage principles, calibration protocols, maintenance, and strategies for selecting the right model for your application—all through the lens of Microfill’s technical expertise.
1. Types of Micropipettes
Classification by Number of Channels
• Single-Channel Micropipettes:

Designed for handling one sample at a time, single-channel micropipettes offer precise and controlled aspiration and dispensing. Their simplicity makes them the preferred choice for routine pipetting in research, diagnostics, and education.
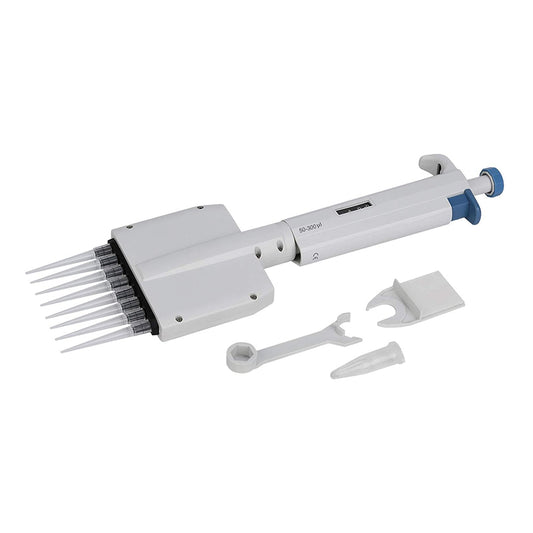
• Multi-Channel Micropipettes:

Multi-channel micropipettes (typically 8, 12, or 16 channels) allow users to aspirate and dispense multiple samples simultaneously. This makes them indispensable for high-throughput environments such as PCR plate setup, ELISA, and genomic workflows. Their ability to mount multiple tips efficiently accelerates workflow and ensures consistency across replicates.
Classification by Volume Adjustment
• Fixed-Volume Micropipettes:
Set to dispense a single, pre-defined volume, fixed-volume pipettes are known for consistency and reliability. They are ideal for repetitive tasks such as routine dispensing of buffers or reagents where accuracy is crucial and variability is undesirable.
• Variable-Volume Micropipettes:
Variable-volume models grant flexibility, letting users select from a prescribed range (e.g., 10–100µl) via a dial or display. This versatility is especially valuable for research protocols demanding multiple volumes, reducing the need for separate pipettes for each measurement.
Classification by Operating Mechanism
• Mechanical (Manual) Micropipettes:
The workhorses of most labs, mechanical pipettes operate on a piston-driven mechanism. The user sets the target volume, then activates the plunger to aspirate and dispense by hand. Their durability, affordability, and tactile feedback make them a staple for both novices and experts.
• Electronic Micropipettes:
Featuring digital controls and motorized actuation, electronic micropipettes excel at minimizing human error, offering higher reproducibility, and accommodating complex pipetting protocols (e.g., serial dilutions, stepwise dispensing). Though more costly, they are indispensable for high-throughput and automation-aligned laboratories.

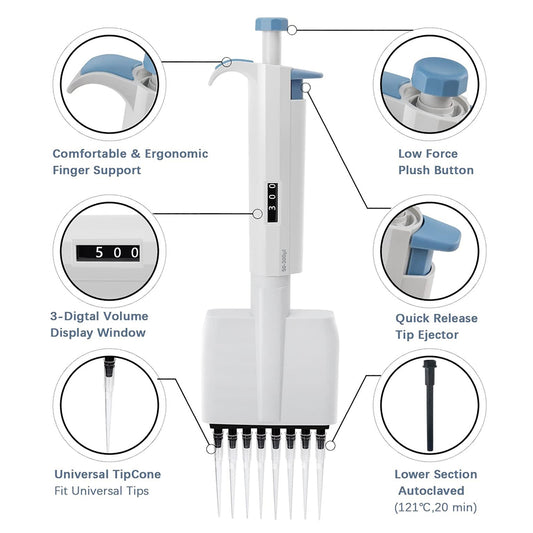
2. Key Components of a Micropipette
Understanding the anatomy is essential for proper use and routine troubleshooting:
• Plunger:
The plunger allows aspiration and dispensing in a controlled two-step motion. Depressing to the first stop aspirates liquid, while pushing to the second stop (blow-out) ensures complete expulsion.
• Volume Adjustment Dial:
Found on variable models, the dial enables users to set and fine-tune the volume. Advanced versions include locking features for added accuracy.
• Tip Ejector:
For user safety and hygiene, the tip ejector button enables hands-free disposal of contaminated tips, preventing carryover and sample contamination.
• Tip Cone (Shaft):
This nozzle-like structure ensures airtight fitting with compatible tips, minimizing the risk of leaks and volume inaccuracies.
• Calibration Screw:
Fine adjustments to accuracy are made via the calibration screw. Regular checks and responsible calibration safeguard measurement fidelity.

3. Applications of Micropipettes
Micropipettes are universally recognized for their pivotal role across scientific disciplines, including:
• Molecular Biology: DNA/RNA extractions, PCR, qPCR, and sequencing library preparation.
• Biochemistry: Precise reagent handling, enzymatic assays, and protein quantification.
• Cell Culture: Inoculation, media exchanges, and cell suspension handling.
• Microbiology: Serial dilutions, plate streaking, and preparation of culture media.
• Analytical Chemistry: Preparation of standards, titrations, and trace analysis.
• Clinical Diagnostics: Sample allocation, aliquoting, and assay setup for serology, hematology, and immunology.
• Pharmaceutical Research: Compound dispensing, formulation work, and assay miniaturization.

4. Principle of Operation
Micropipettes work fundamentally through air displacement:
• Filling: Press the plunger to the first stop, creating a vacuum that draws liquid into the tip as the plunger is released.
• Dispensing: Depress the plunger to the first stop to dispense the set volume; press further to the second stop to expel any residual liquid and ensure complete delivery.
This system ensures precise control over aspirated and dispensed liquid, a feature critical for reproducibility in analytical work.
5. Step-by-Step Guide: How to Use a Micropipette
1. Choose the Right Micropipette and Tips:
Select a model whose range covers your intended volume and is compatible with good-quality, leak-proof tips.
2. Attach the Pipette Tip:
Gently press the shaft into a tip, avoiding excessive force. A proper fit is essential for preventing leaks.
3. Pre-wet the Tip (if necessary):
Aspirate and dispense the liquid 2–3 times before actual measurement to enhance accuracy—especially important for small volumes or viscous samples.
4. Aspiration:
• Set the desired volume.
• Depress the plunger to the first stop.
• Immerse the tip vertically (at a 90° angle) just below the surface of the liquid.
• Slowly release the plunger to aspirate the sample.
5. Dispensing:
• Touch the pipette tip to the receiving vessel wall.
• Depress the plunger to the first stop to deliver.
• Push to the second stop to expel any sample remaining.
6. Tip Disposal :
Eject the used tip immediately to avoid cross-contamination.
Forward vs. Reverse Pipetting
• Forward pipetting : Standard technique for most solutions, delivering an accurate volume.
• Reverse pipetting : Recommended for viscous or easily foaming liquids, and very small volumes. In this method, a small excess is aspirated and only the desired volume is dispensed, leaving a residue in the tip.
6. Calibration: Ensuring Precision and Accuracy
Accurate measurement is the heart of reliable science, and regular calibration is necessary for maintaining micropipette performance.
Overview of the Calibration Process
1. Prepare Materials:
o Micropipette and compatible tips
o Distilled water or manufacturer-approved calibration solution
o Analytical balance (mg precision)
o Gloves, lab coat
2. Prep and Clean:
Ensure the pipette and tips are clean and free from residue.
3. Set Desired Volume:
Set your micropipette to the volume to test (often the maximum, midpoint, and minimum).
4. Dispense Test Liquid:
Aspirate and dispense water at room temperature into a pre-weighed vessel.
5. Weigh and Calculate Volume:
o Measure mass of water dispensed
o Use water density (typically 1mg/µl at room temperature) to calculate volume
6. Assess Results:
o Compare calculated volume to target; acceptable error is typically within ±2–5%
o Calculate percentage error
7. Adjustment:
If error exceeds tolerance, adjust using the calibration screw per the user manual and repeat the process.
8. Document Results:
Log serial numbers, volumes, dates, solution used, weights, actual volumes, and any adjustments.
9. Final Validation:
Repeat dispensing/measurement to confirm calibration across volume range.
When is Calibration Required?
• On first use of a new device
• According to routine schedules (e.g., every 3–6 months or as local protocols require)
• After servicing, repair, or major maintenance
• If there is a change in laboratory conditions (temperature, altitude)
• Before critical or regulated work requiring traceability
7. Cleaning and Maintenance of Micropipettes
External Cleaning
• Remove the tip ejector and clean separately.
• Wipe all exposed surfaces—body, buttons, tip cone—with a lint-free cloth.
• For persistent dirt, use a soft-bristled brush.
• Disinfect with isopropanol or compatible cleaning solutions, avoiding harsh chemicals.
• Reassemble and allow to air dry thoroughly before reuse.
Internal Cleaning (For Trained Personnel Only)
• Carefully disassemble the pipette.
• Clean all internal surfaces—piston, O-ring, seals, tip holder—with alcohol wipes.
• Ensure components (especially the piston) are completely dry to avoid corrosion.
• Lubricate per the manual’s recommendations (if required).
• Follow the manufacturer’s reassembly instructions to prevent misalignment or leaks.
Routine Maintenance & Storage
• Inspect pipette visually for dust and contamination before daily use.
• Store upright to prevent potential contamination or tip deformation.
• Use only isopropanol for cleaning; other solvents can damage components.
• If used daily, schedule detailed internal inspection every three months.
8. How to Choose the Right Micropipette
Key factors for selecting the ideal micropipette for your research or diagnostic application:
• Volume Range:
Ensure the pipette’s volume specification matches your usage requirements.
• Universal Tip Cone:
A universal shaft allows compatibility with various reliable tip brands.
• Autoclavability:
For strict sterility, choose models autoclavable at the required temperature.
• UV-Resistance:
Essential for use inside hoods with UV decontamination cycles.
• Ergonomics:
Analyze the design for user comfort—especially critical for repetitive work to prevent injury.
• Calibration Certification:
Verify pre-calibration for accuracy and adherence to ISO standards; look for models with calibration certificates.
• Accuracy and Precision:
Cross-reference ISO-compliance and check user reviews for performance validation.
• Cost and Warranty:
Balance your budget with necessary features, and check after-sales support, warranty, and service center proximity.
Microfill is dedicated to producing reliable, high-performance liquid handling products designed to exceed real-world lab expectations.
9. Frequently Asked Questions (FAQs)
1. Can I use any brand of pipette tips?
If your micropipette features a universal tip cone, you can use a wide variety of tips, provided they match the volume range.
2. What’s the best practice for sterilization?
First, check if your model is autoclavable. If so, sterilize according to the manufacturer’s recommended settings—always confirm compatibility with your specimen’s needs.
3. How to check calibration yourself?
Set the usual volume, dispense water five times, and weigh each on a calibrated balance. Compare to expected volume using ISO standards as a reference. If outside tolerance, initiate recalibration.
4. How frequently should I recalibrate?
Every 3–6 months for high-use environments, or annually as per ISO 8655. Adjust frequency for critical or regulatory workflows.
5. Adjusting the volume:
For variable models, use the rotational dial (typically on the plunger or shaft). Refer to the manual for precise operation.
6. Why avoid touching pipette tips?
Touching tips can introduce skin oils or contaminants, leading to volume inaccuracies and risking sample integrity. Always use the pipette ejector.
7. What if the plunger is released too quickly?
Fast release may cause air bubbles or inaccurate aspiration. Operate slowly and smoothly for best results.
8. Troubleshooting performance issues:
Check calibration, ensure tips are properly seated, and inspect for physical damage. Clean and maintain regularly. Persistent issues may require professional service.
9. Handling different liquids:
Whether aqueous, viscous, or oily, most micropipettes can handle various sample types with proper technique and tip selection.

